Working with Layers and Tools
This is where we make the default skins appear muscled and add shadows for that toned affect.
Assuming you already have my skin file templates downloaded from here . Both the MaleMasteHead and MaleMasterBody have them unzipped and opened in Photoshop….then we can begin.
For this tutorial I will be using Adobe Photoshop CS version 8.
As explained in the 2D Layout tutorial, Your avi in IMVU is made up of layers, First you have your Body, basically known as your Avi, Then comes your Skin this wraps around your body, and last you have all the stuff that can go over your skin, clothes, accessories, some of these items can change the shape of your avi body, Give a guy bigger muscles or a gal bigger breasts or a tiny waist. So these body changes come from your Clothing mesh, NOT your skin
So you can not make a skin have bigger muscles or bigger breasts, all you can do with your skin, is give it the best appearance with shadows and colors to seam like they have, so when you place your clothing over the skin it will make those enhancements you added, look 10 times more awesome.
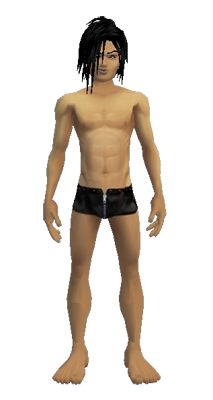
What we are going to achieve in this tutorial is to make your male body go from the default in this left picture, to the enhanced, in the right picture. I am going to use the 50 Deg skin, but these tips can be used on any of the skin tones in the file you downloaded from my site.
|
Before |
After |

First we are going to play with the layers within the files. You should already be familiar with the layer panel a little from the last tutorial.
So… Look over your layers that the file came with, your layers panel should be on the right hand side of your screen, if you don’t have a Layer tool box visible as yet on your Photoshop work area, find it via your windows tab up the top bar of Photoshop…then in the drop down menu…choose Layers…..and it will open all your needed layers Panel.
I want you to open the little drop down arrow beside the folder called Final Layers…You can play with turning on and off the little eyes next to each layer to make them unvisible or visible on your skin…this will give you more of an idea on what each layer adds to the final appearance.
Now select the layer called SHADOW_25% copy click on the actual tab to make it go a darker grey then go up to the Opacity slider….slide that up and down and look at your skin…notice it will go dramatically more enhanced to show deeper shadows.

On each set of skin files you will see many diff layers that you can play with the opacity to acheive diff shades of each. There is a layer there called SHADOW_copy 2 …this is your abs Layer…bring the opacity of that one up to 100%….then to make it more defined duplicate that layer by right clicking on it and selecting duplicate. Do this as many times as you like to get a deaper abs look.

You can duplicate any of the layers to give the deaper enhanced look. Now say you want to make this into a vamp skin. all you now need to do is uncheck the eye next to the 50 Deg base layer down the bottom…and select the White Vamp Layer. This will keep all your shadows still enhanced. You can change it to any of the shades you like….Have a play. Hover over any of the layers in the pic below to get a quick idea on what some of the tones look like.
Ok….so you will notice that some of the shadings on the diff tones just dont look right…..like the darker tones the highlights look way to light…..to fix this all we do is change the color of the shadings.
So we go backup to our Final layer Folder…Double click on your shading layer and the Layer Style box will appear…in this box you can do a lot of cool things for text affects also….we will cover that in a later tutorial…..for now we need to highlight the color overlay section…you will see a little red box in the right hand top side….you need to click on the red square and select Black……darker skintones always look better with a black shadow….you can also make your vamp skins look better with a black shadow also.

Click ok once you have selected your color…..now just drag and drop from your layer pannel…that layer overlay into each shading color. You will see the affect that it brings automaticly.

*IMPORTANT….what ever color you choose to overlay ‘remember’ what that color you chose was…..because when you do your head you will need to overlay the shadings on your head the same….if you don’t you will end up with mismatched colors from your head to your body around the neck section……and I have seen many of these miss-matched skins out there….
You can also over overlay diff colors for your fingernails and toenails this way….and for your head you can overlay a diff color for your lips.
But Wait….there is more….chuckles..
Now you have your basic layers looking good….we can still add a few more enhancements to make our avi look that little bit better…here we go….ya ready..
Now we are going to do some drawing ……(I can see you rolling your eyes…saying no no no…no drawing please)….its ok…it aint that hard once you get the hang of it….a few practice tries and you will be fine…….
Select your paint brush tool ![]() then select your color shade…
then select your color shade…![]() .you want a dark color preferably the same color as your shadings……or if your doing a real dark skin…you’ll want a lighter color so it will show on your skin.
.you want a dark color preferably the same color as your shadings……or if your doing a real dark skin…you’ll want a lighter color so it will show on your skin.
Here I would normally Double my skin size….just to bring the image closer so we can see what we are doing…by using the little percentage in the bottom left of your screen….this is usally set on 100%….just change it to 200%…..
Now we need to make a new layer so we can alter it or delete it if we stuff up…..go to layer tab up top….new layer…keep it transparent….Now we are ready to do some drawing..
This really comes down to your own skills here..I cant hold your hand for you with this part….draw around the outer sides of your abs….then you can do some extra lines on the back…..and arms…under the pecks and also between the pecks up the chest area….then along the collar bone as well….wherever you think there should be some muscle or bone shaping…….once you have drawn them….you then use your blur tool ![]() set to about
set to about ![]() youll find that slider up on the top of your photoshop…this is really trial and error with this….play around untill you get the desired affect….
youll find that slider up on the top of your photoshop…this is really trial and error with this….play around untill you get the desired affect….


Once you have the bluring done…you may want to lighten it a little to have a softer look…by changing the opacity of that new layer you just created…..just bring it down from about 100 to whatever looks good……….Sometimes its best to have your previewer up while your working and test it out…save your file as a .png file and upload that texture into your body material section…and take a look…if it doesn’t look good…come back and try it all over again….
Now that you have done that……we need to add some highlights to your skin….to give it that raised shine to your muscles….this we need to do on the actual base layer…so scroll down your layer panel and select your base layer 50 Deg…..Duplicate this layer…so you now have 2….one u can work on….and one for a backup…in-case you stuff up.
Now select your dodge too from your tools panel ![]() ..what this little niffty tool does…is it takes whatever color u have…and it lightens it a few shades lighter…..If you right click on that tool…you will notice a few other handy tools also…..in there you will find a burn tool…..
..what this little niffty tool does…is it takes whatever color u have…and it lightens it a few shades lighter…..If you right click on that tool…you will notice a few other handy tools also…..in there you will find a burn tool…..![]() ….this tool will darken whatever color u are working on……some like to use this on the base deg instead of the paintbrush drawing……but for the male skins when you use the shading layers….a lot of times the work you do on your base…..wont show up under your other shading layers….that is the reason I paint instead of burn….for my male skins..
….this tool will darken whatever color u are working on……some like to use this on the base deg instead of the paintbrush drawing……but for the male skins when you use the shading layers….a lot of times the work you do on your base…..wont show up under your other shading layers….that is the reason I paint instead of burn….for my male skins..
Ok..so we want the dodge tool…..you can bring your skin file back down to 100 % again now…so we can see the full skin…..set dodge tool to these settings..you’ll find that info…on the top bar of your Photoshop when u click on your dodge tool.

Make sure the range is on highlights….now we want to add some highlights to the middle of your abs….to the chest area…the the ass….some can go on the top back….this is again really up to you and what you think looks good…this is what I do…add a little here add a little there….lol….just be creative…now once you have added those…use your blurr tool…and go over them a little…to blurr it into your skin…and give it that smooth look….
|
Before |
After |


Ok…Your done with your body……..YAY……save your file as a png..test out your skin in the previewer…..see if you like your look….your own skills will come into it here…..as there are a lot of diff ways you can go….to achieve the look you desire….Just play…be creative…..make your own unique style….
Dont forget to also save your file as a Photoshop file….so you can always use that as your base template for whatever degree skintone you wish.
For your head…..there is not much you need to do…..but you can change the lips…..you can paint on eye makeup……you can use the layers within that file to put a beard on….or a goatee if you wish….some of those things are already there in those layers for u to play with…..you can add a lip ring….the ideas are endless….as I said before….be creative…have fun….
Its what being a developer is all about….
Please drop me a message if you found this tutorial useful…..as feedback is always good to have….tutorials take time to make….and its nice to know people out there are using them…..you can send me a message straight from this site in contacts section….
MissVix

